Enter a health screening for a group of students
You can record a screening for a group of students at one time. Record screenings by group type, such as homeroom, section, or grade level.
To record a screening for a group of students at one time:
- Log on to the Health view.
- Click the Screening tab, and then click the Group Screenings side-tab. The Group Screenings page appears.
-
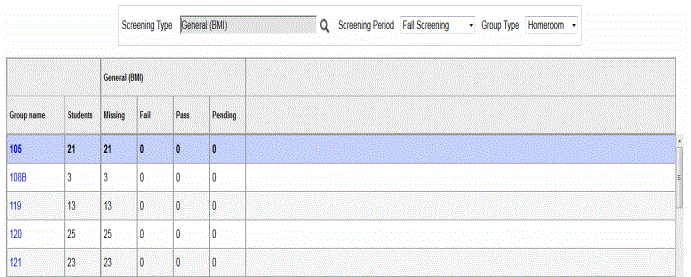
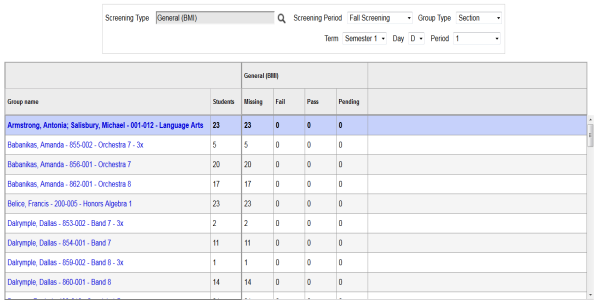
- Above the list,
select the following to determine the information that appears on the page:
- Screening Type:
Click
 to make your selection(s). You can select an unlimited number
of screening types; a horizontal scroll bar lets you access all of
the data.
to make your selection(s). You can select an unlimited number
of screening types; a horizontal scroll bar lets you access all of
the data. - Screening Period: Click the drop-down to select the screening period you are performing the screening(s) in.
- Group Type: Click the Group Type drop-down to select Homeroom, Section or Grade Level. If you select Section, three fields appear for you to further filter the list by. Click each drop-down to select the term, day, or period you want to work with. The list updates according to the teacher's name and course name.
- Screening Type:
Click
-
Note: Depending on your user role privileges, some Group Types might not be available to you.
- Click a Group name to record the results for that group:
-

- Enter information in the fields, keeping the following in mind:
- To change the default fields that
appear (for example, so that nurses can create personal field
sets), click
 next to the
screening type name, then select Manage
Field Sets.
next to the
screening type name, then select Manage
Field Sets. - Select the field set you want to work with, and then click Close.
- To quickly move across fields (except Comment boxes), press the Tab key.
- To repeat the same value (such as Pass) down the rest of the rows in a column, go to Options > Fill-Down Values (or press Ctrl + D).
- To revert the current cell to its previous value, go to Options > Revert Current Cell (or Ctrl + K).
- To enter a comment for a result, you must have
entered data in at least one field. Click
 and
type your comment in the Comment
pop-up. Click OK. The
icon now displays blue lines
and
type your comment in the Comment
pop-up. Click OK. The
icon now displays blue lines  to let
you know that a comment exists.
to let
you know that a comment exists. - Calculated fields (such as Percentiles for height and weight, and Body Mass Index) are updated automatically once you fill in the appropriate data.
- As soon as you enter data in a field, the record is automatically saved with the current date.
- The default Result code is set to Pass. This means that any result you enter in the group screenings area will, by default, set that result code. If you are using a custom Result code reference table or you would rather have the field default to another value, click the drop-down to make your selection.
- To return to the
list of group screenings, click the Group
Screenings side-tab or click Group
Screenings in the breadcrumbs
 a navigation technique to help users keep track of their location within Aspen; appear as links at the top of every page:
The system automatically saves the results when you leave the page.